The ABC's of Communication for Marketers & Advertisers
Tue, 11 March 2025

Follow the stories of academics and their research expeditions
Narration is an essential part of telling stories, and it is what you repeatedly do when creating tutorials, explainer videos, reels, and documentaries. However, it does not always happen that high-quality voiceovers are easy to record; everyone cannot afford studio equipment or a voice suitable for every intonation. Where CapCut Desktop comes into play is with its ultra-powerful Text-to-Speech AI tool.
The "Text to speech" option introduced in CapCut enables creators to transform text scripts into voiceovers featuring a natural and authentic sound with a couple of clicks. Your desired tone, whether professional, dramatic, or fun, will be available in more than one voice, language, and even accent, and you do not have to record it.
This is particularly handy to YouTubers, instructors, and marketers ready to add spice to videos through outstanding voiceovers. Together with such functions as the AI voice generator, CapCut will enable you to transform your lifeless documents into fascinating stories right on your desktop.
The following are the reasons why the CapCut Text to Speech tool is remarkable:
- Dozens of voices (female and male voices) in different tones
- Various languages and accents enabled
- Speedy right text-to-audio translation
- Included in the editing schedule - no third-party applications required
You no longer have to spend hours recording and editing your audio files; instead, you can attend to the creative aspect, which is the actual writing of the great script and seeing it come to life.
Launch CapCut Desktop and press on a "Create project" to start. Put a name on your project, should you feel like it, then go into the main editing window. The layout will be familiar to you, with the timeline at the bottom, the preview player at the top right, and the assets of your media on the left side.
You should go through the side menu by clicking on the tab named "Text" to get the tool. After that, you need to click on "Text to speech", which lies on the top right-hand side of the pop-up "Text" settings box.
A small box will come in which you may begin typing or pasting your script. This is the place where the magic happens, as soon as you receive a spoken narration based on your written words, using the technology of AI in CapCut.
There is no easier way to make your messages come to life than with CapCut, and you can combine the voiceovers with the footage you have to have video and audio quality in line with each other, so your videos are the sharpest and the cleanest before adding any editing.
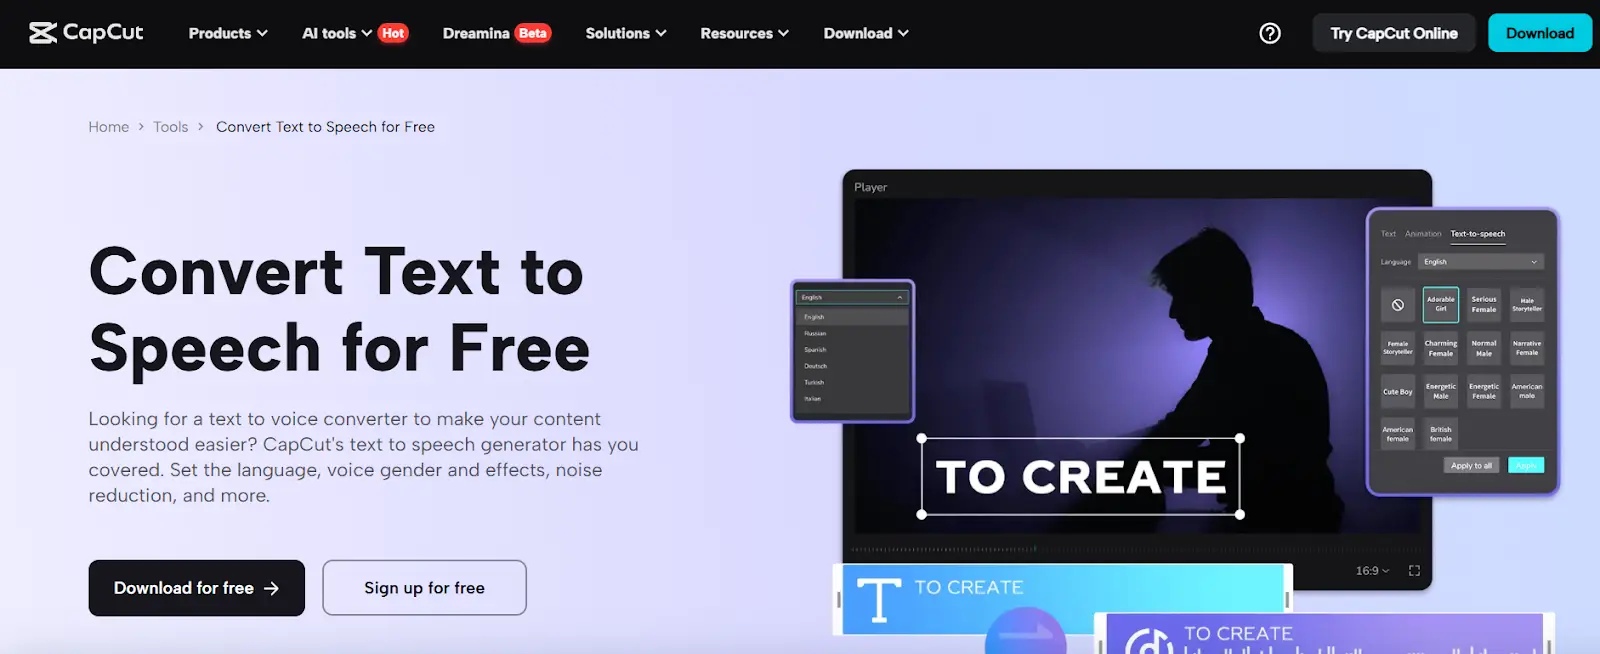
Within the "Text to speech" panel, you are going to find several drop-down menus. First, choose the voiceover language, and CapCut is compatible with English, Spanish, French, Arabic, Chinese, and others. Select a voice style from the list of male and female voices next. The tone and pacing of each voice differ minutely, and so you can give a sprinkling of a few by clicking on the Preview button.
You can also select the tone (cheerful, deep, calm, or formal) according to the mood of your video. No matter what you are creating (be it a corporate pitch or a cartoon animation), there is a voice style that suits it.
As soon as you have a ready text and have found the settings of the voice with which you would like to work, press the button marked with the word, "Generate speech". CapCut will work on the script and bring out a usable voice-over file.
The created audio file will automatically show in your "Media" bin. All you need to do is drag and drop it onto your timeline just as you would any audio clip. You may cut it, change the volume, or put background music under it to give it a professional outlook.
In case you are augmenting prior shots, you may align the voice track accurately with your clips or dances. Also, remember that in case your video has low-resolution clips or blurred details, you can enhance video clarity using another helpful tool, the AI Video Upscaler, to fix everything before it is too late.
With the voiceover in place, play your timeline to check if the pacing fits your visuals. Use CapCut’s editing tools to cut or extend visuals so they align smoothly with the narration. You can also add captions by going to the "Captions" tab and using "Auto Captions", making your content more accessible and polished.
Once satisfied, hit the “Export” button at the top right corner. Choose your resolution, frame rate, and format — and that’s it. Your video is now ready with professional-grade voiceover narration powered by text-to-speech AI.
CapCut’s text-to-speech AI isn’t just a time-saver — it’s a creative accelerator. Here’s why creators love it:
- Perfect for non-native speakers or creators who prefer not to use their voice
- Great for batch production — just paste a newscript and generate a new voice
- Zero need for recording equipment, mic setup, or soundproofing
- Custom voiceovers in seconds, available in many accents and moods
Whether you’re creating educational content, product explainers, or social media reels, CapCut’s text-to-speech gives your scripts a voice, without the usual recording hassle.
Thanks to CapCut’s Text to Speech AI tool, voiceovers are no longer a challenge, even for solo creators. With its seamless workflow, multilingual support, and natural-sounding output, it's never been easier to bring your scripts to life. You can now pair stunning visuals with equally engaging narration — all inside CapCut.
Narration is an essential part of telling stories, and it is what you repeatedly do when creating tutorials, explainer videos, reels, and documentaries. However, it does not always happen that high-quality voiceovers are easy to record; everyone cannot afford studio equipment or a voice suitable for every intonation. Where CapCut Desktop comes into play is with its ultra-powerful Text-to-Speech AI tool.
The "Text to speech" option introduced in CapCut enables creators to transform text scripts into voiceovers featuring a natural and authentic sound with a couple of clicks. Your desired tone, whether professional, dramatic, or fun, will be available in more than one voice, language, and even accent, and you do not have to record it.
This is particularly handy to YouTubers, instructors, and marketers ready to add spice to videos through outstanding voiceovers. Together with such functions as the AI voice generator, CapCut will enable you to transform your lifeless documents into fascinating stories right on your desktop.
The following are the reasons why the CapCut Text to Speech tool is remarkable:
- Dozens of voices (female and male voices) in different tones
- Various languages and accents enabled
- Speedy right text-to-audio translation
- Included in the editing schedule - no third-party applications required
You no longer have to spend hours recording and editing your audio files; instead, you can attend to the creative aspect, which is the actual writing of the great script and seeing it come to life.
Launch CapCut Desktop and press on a "Create project" to start. Put a name on your project, should you feel like it, then go into the main editing window. The layout will be familiar to you, with the timeline at the bottom, the preview player at the top right, and the assets of your media on the left side.
You should go through the side menu by clicking on the tab named "Text" to get the tool. After that, you need to click on "Text to speech", which lies on the top right-hand side of the pop-up "Text" settings box.
A small box will come in which you may begin typing or pasting your script. This is the place where the magic happens, as soon as you receive a spoken narration based on your written words, using the technology of AI in CapCut.
There is no easier way to make your messages come to life than with CapCut, and you can combine the voiceovers with the footage you have to have video and audio quality in line with each other, so your videos are the sharpest and the cleanest before adding any editing.
Within the "Text to speech" panel, you are going to find several drop-down menus. First, choose the voiceover language, and CapCut is compatible with English, Spanish, French, Arabic, Chinese, and others. Select a voice style from the list of male and female voices next. The tone and pacing of each voice differ minutely, and so you can give a sprinkling of a few by clicking on the Preview button.
You can also select the tone (cheerful, deep, calm, or formal) according to the mood of your video. No matter what you are creating (be it a corporate pitch or a cartoon animation), there is a voice style that suits it.
As soon as you have a ready text and have found the settings of the voice with which you would like to work, press the button marked with the word, "Generate speech". CapCut will work on the script and bring out a usable voice-over file.
The created audio file will automatically show in your "Media" bin. All you need to do is drag and drop it onto your timeline just as you would any audio clip. You may cut it, change the volume, or put background music under it to give it a professional outlook.
In case you are augmenting prior shots, you may align the voice track accurately with your clips or dances. Also, remember that in case your video has low-resolution clips or blurred details, you can enhance video clarity using another helpful tool, the AI Video Upscaler, to fix everything before it is too late.
With the voiceover in place, play your timeline to check if the pacing fits your visuals. Use CapCut’s editing tools to cut or extend visuals so they align smoothly with the narration. You can also add captions by going to the "Captions" tab and using "Auto Captions", making your content more accessible and polished.
Once satisfied, hit the “Export” button at the top right corner. Choose your resolution, frame rate, and format — and that’s it. Your video is now ready with professional-grade voiceover narration powered by text-to-speech AI.
CapCut’s text-to-speech AI isn’t just a time-saver — it’s a creative accelerator. Here’s why creators love it:
- Perfect for non-native speakers or creators who prefer not to use their voice
- Great for batch production — just paste a newscript and generate a new voice
- Zero need for recording equipment, mic setup, or soundproofing
- Custom voiceovers in seconds, available in many accents and moods
Whether you’re creating educational content, product explainers, or social media reels, CapCut’s text-to-speech gives your scripts a voice, without the usual recording hassle.
Thanks to CapCut’s Text to Speech AI tool, voiceovers are no longer a challenge, even for solo creators. With its seamless workflow, multilingual support, and natural-sounding output, it's never been easier to bring your scripts to life. You can now pair stunning visuals with equally engaging narration — all inside CapCut.

Sprintzeal
Tue, 11 March 2025
Tue, 11 March 2025

Tue, 10 December 2024


© 2024 Sprintzeal Americas Inc. - All Rights Reserved.
Leave a comment